
Hello everyone, and welcome, once again, to my Tuesday hobby post. Today, I am tired. This is because last Thursday I had a job interview. An hour after I finished the interview i got a call. I started yesterday. This meant I was extremely glad I did so much painting last week, because otherwise I would never have had my army ready for the tournament this weekend! While I am extremely grateful to have a job at last, it is going to mean much less time for 40k, so don’t be surprised to see a little less of me until things get adjusted.
Anyway, enough of my ramblings and on with today’s post. This is the final part of my guide to converting a Vendetta Gunship. Find the rest here. Today I will do a quick run-through of the interior.

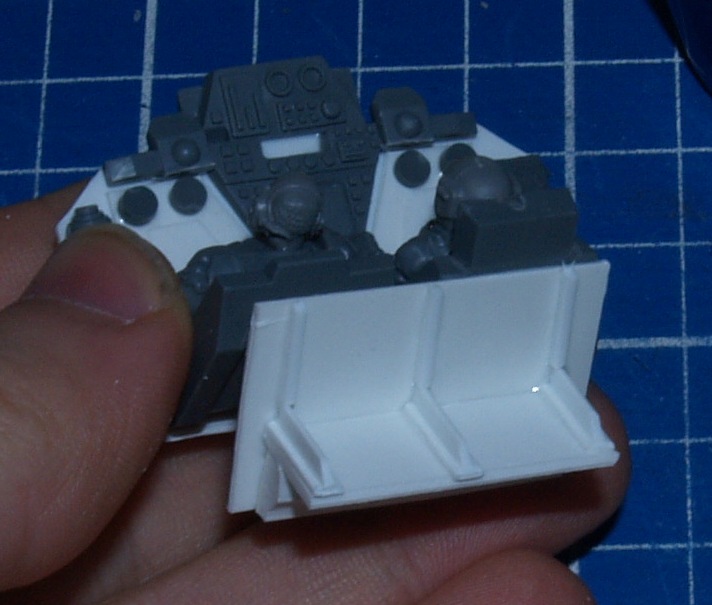
Firstly, I built the pilot and co-pilot. The parts of the valkyrie kit needed are shown above. The panels with instrument dials have been sawed from their respective mounts, as these will not be needed.

The chairs were trimmed down like so, and mounted side by side on a small base of plasticard.

This photo shows the completed instrument panel. I didn’t get a picture, but the rear of the panel is formed by the piece in the far left bottom of the first photo. The other bits are from other kits, or are just bits of sprue. Incidentally, I completely forgot to trim the bottom corners of the panel, and as a result it didn’t fit at all. I had to rip the entire thing apart and cut it down before trying again. Very irritating.

This shows the panel mounted in front of the pilots (who have heads now). The angle is a bitch to get right, since the whole thing has to fit in the space provided.

And here it is sitting in place. It's not glued, since I need to paint both the interior and the pilots etc before they are stuck down.
On the back of the pilots chairs are seats for two of the passengers. They are made in the same way as those below.

The seating for the passengers was very simple to construct. I just used various different shaped plastic rods and pieces of plasticard to create two pillars, and joined them with the two flat seats.

This shows how it is held together underneath.


To make the crossbeams I used two small plastic girder sections. Note the small cuts in the centre of the girders so that they fit together properly.


I kept my seats simple since I suck horribly with green stuff. Simply cutting some plasticard girders into sections and angling one end was good enough for me.

Having said I suck with plasticard, I then went and made these :P. These shields represent various families and clans in the planets where part of my regiment was recruited. They will be mounted on the walls of the passenger compartment.
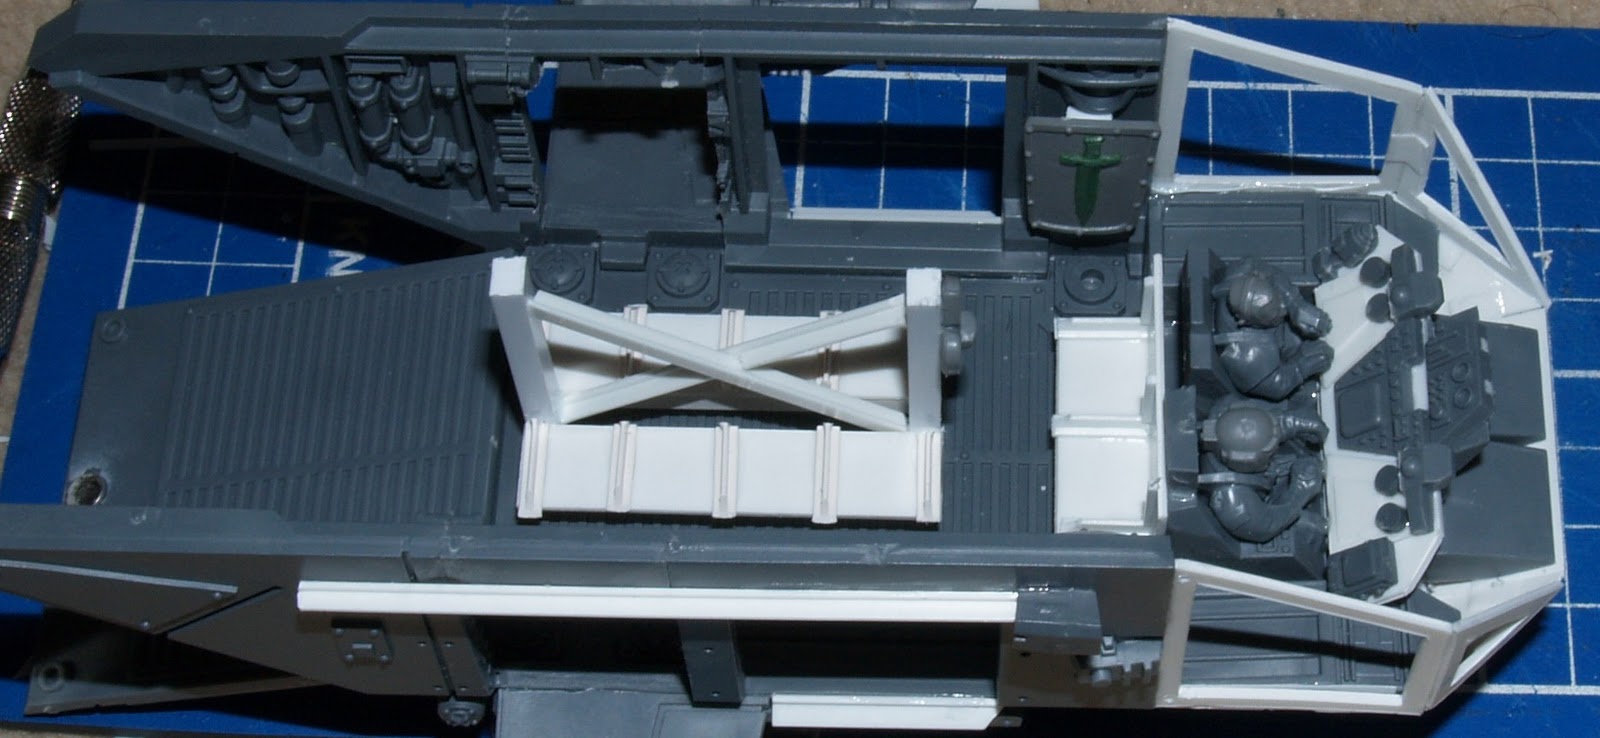
And here it is, the completed interior. The shields are magnetised, and nothing else will be glued down till it is all painted.
I hope everyone who has read any of these guides has got something out of them. Making these models was one hell of a learning experience for me, and I hope some of you can learn from my mistakes, or are at least inspired to try making something out of plasticard. However small your creation, making it will be very satisfying, and at the very least it will always be unique.
Till next time.
That was plasticard for the middle section? I was convinced that was out of the vendetta kit or something. On the models it just fits so well.
ReplyDeleteAwesome stuff.
Hard at work painting my stuff now - got about 60% of a squad done today alone which I am pretty pleased about - not to mention squeezed in a 1500 game.
Job going well? I have a table @ 7:30 again on Thurs but guessing your prob going to use it for last minute prep b4 the tourney. Shame Ross backed out of our game, fancied playing that list lol.
lol, the reason it fits so well is because it IS plasticard ;)
ReplyDeletegood to hear you are getting squads painted, nothing like a deadline, no matter how far away!
i doubt i'll be down on thursday. while i have actually completely finished painting everything, i really want to add some details to my tanks. stuff like squadron markings, just to make them stand out a bit more. if i'm honest, i'm just after a few best army votes. even if i dont win, i want to show off a bit :D
Awesome post mate, inspirational series of articles.
ReplyDeleteI'm straring at a dozen marines as I write this, all of which have only their base coat of red... not even close to resembling the red/white finished product.
AS for tanks...don't get me started lol... all "three-colours min" but nowhere near all weathered etc.
No votes for me, ah well - I'll just have to win it... ;)
Yeah a bit of detail to your tanks will go a long way - like you say - squad markings and the likes - the fact everything is based/painted and you have 2 uber conversions and then a ton of big conversions - you have a good shout.
ReplyDeleteMy plan for brighton isnt quite best army - though I feel with my painting and pretty much every squad having at least some alterations (and 3 decent conversions) I'll have a good shout on geting good soft scores.
Going to give plasticard bases a go this weekend though, I do have a back up plan for them aswell if my painting skills arent quite up to par on my idea.